If you’ve ever explored writing apps beyond your standard word processor, you’ve likely heard of Scrivener. This powerful piece of software is the secret weapon for a number of prolific writers.
But when combined with ProWritingAid’s editing suite, Scrivener can super-charge your writing process. Consider this your guide to adding Scrivener’s powers to your writing toolkit.
Why Scrivener?
So, what is Scrivener and why is it any better than Word, Pages, Google Docs or any of the other word processing software out there?
Well, think of Scrivener like a cross between a binder and a bullet journal for your project. One where every word is searchable, order can be endlessly rearranged and every scene and chapter is at your fingertips in just a click. Compared to typical word processors, Scrivener gives you better control, improved editing process tools and easier navigation for long-form projects like books or novels.
Scrivener’s feature set is vast, with far too many tools to list here. But here’s a sample of some of the most useful features:
- A writing history tracker: So you’ll never wonder how many words you wrote on a certain day again
- Color coding tools: For those of us who might need some extra help to keep track of draft passes
- A document snapshot tool: To make sure you never lose an important detail to rewriting again
- A word frequency analyzer: Because there’s a fine line between a motif and overuse
Unfortunately, all of these features do have a downside: for Scrivener newbies, the program can quickly become overwhelming. In fact, feature overload is the number one complaint among those hesitant to start with Scrivener.
But, it doesn’t have to be this way. We’ll break down creating a project in Scrivener from square one, guiding you through every click of the navigation. Once you’re used to navigating the software, we’ll explore the more advanced features listed above and examine how ProWritingAid can take your project to even greater heights.
A quick note before we get started: All screenshots in this tutorial were taken on a Mac using Scrivener 3. If you have a Windows machine or an older version of Scrivener, your interface may look slightly different.
Scrivener Startup
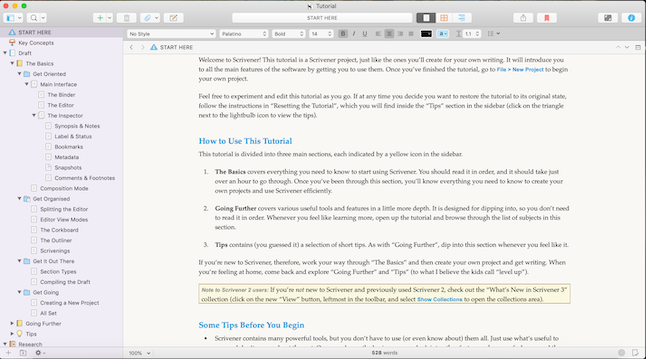
After you’ve downloaded and installed Scrivener, you’ll open the program to this screen:

See those tutorials on the right side of the window? Save those for later. They’re helpful, but might be a bit too much at once for those brand new to the program.
To see your available template options, select your project type in the sidebar. Usually, template selection is fairly self-explanatory. But, if you find a template doesn’t quite suit your needs, you can always edit it.
Here’s an example of the novel project:

And this is usually the point that most people stare at the screen blankly before closing the app and swearing they’ll never use it.
Don’t panic. Scrivener is an app that you’ll want to cherry-pick features rather than attempt to use everything at once. Let’s start by getting comfortable with the navigation.
Navigating Your Project
Before you get started with adding files and documents, you need an idea of what each part of the interface does. The Scrivener interface can be broken down into four parts:
- The Toolbar
- The Project Binder
- The Editor
- The Inspector
Each can be seen here:

The Toolbar contains navigation and search tools on the left-hand side of the screen with viewing tools on the right side of the screen. To see the function of each button, simply hover over it for a moment. Note the add folder/text button to the left and the inspector pane collapse/expand button to the far right.

The Binder, found on the left-hand side of the screen, functions as a file navigator. The majority of your work will be done in the Manuscript folder, with occasional visits to the Research and Notes folders. All the documents and folders within the Binder can be rearranged with a simple drag and drop. If the Binder seems a little cluttered initially, you may want to place lesser used folders (like the Front Matter and Template Sheets folders) lower in the binder or group them in a larger folder.
In the middle of the screen, the Editor functions similarly to any other word processor. You can change font types, sizes and styles along with altering paragraph alignment and styles. Information on your word and character count (along with a host of other statistics like reading time) can be found by clicking at the bottom of the screen.

On the right-hand side of the screen, you’ll see the Inspector toolbar. For the most part, the majority of these functions are fairly advanced. If you’re just getting started with Scrivener, collapsing this pane is likely your best bet. Once you’re comfortable with the other functions, you can dive into some of these features—starting with the ones we’ll discuss in just a bit!
Now that you’re comfortable navigating Scrivener’s interface, it’s time to get down to work on your project.
Working with Your Project
If you’re starting a Scrivener project completely from scratch, your first step will be to create a chapter and scene (or chapter section if you’re writing nonfiction). Chapters, as you’ll see in many of the templates, are made up of folder dividers while scenes and chapter sections are simply text files.
To create either, mouse up to the green “+” icon at the top left side of the screen, click the small arrow beside it and select “New Folder” or “New Text.” The new item will pop up in your binder, either at the bottom of your selected folder or directly below your current selected text file. Scene and chapters can also be added by selecting, then copying and pasting into the Binder.
But, it’s rare that anyone starts with Scrivener with a completely blank slate. Most likely, you have scenes, chapters or even the majority of a manuscript written in another program. Fortunately, Scrivener has a fix for this too.
Navigate to “File” -> “Import.” Within that menu, you have the option to import individual files, which works great if you use a “each chapter is a separate file” approach in your drafting. But, if you keep your work in one large file, you’ll want to click “Import and split.” When you do, you’ll see this screen:

Make sure the “Options” toolbar is open at the bottom of the window. Here, you’ll want to type in the divider you use for your scenes. This lets Scrivener know where to separate out the files. The default is “#” but it can be changed to any combination within the “Options” toolbar.
From there, Scrivener does all the work, separating your scenes and chapters into folders and files. Like any import, however, it can be prone to the occasional bug. Always make sure to double check behind the importer to ensure your scenes were brought over correctly.
At this point, you can dive into any file and start working with it within the Editor. If you need to rearrange any text files or chapters, visit the Binder and drag-and-drop until you’re satisfied with the order. If you’re trying to find a specific phrase or replace a certain word, simply click the magnifying glass icon on the left side of the toolbar above the Binder to open the find and replace toolbar.
As you become more comfortable with working within Scrivener, you may wind up creating your own structure for your projects. This can be saved as a project template by navigating to “File” -> “Save as Template.” Simply be aware that any files within the project at that time will be part of the project template, so it’s best to start with as close to a clean-slate as possible if you’re making a template.
Finally, when it comes time to move your Scrivener project to another program, navigate to “File” -> “Compile.” You can then check off the documents you want included in your export, change the final document appearance and choose between a vast number of file formats to export. Depending on your needs, this process can get a bit involved. So, I’d suggest exploring this guide to Scrivener 3’s Compile Function or this tutorial on compiling a .docx file .
Advanced Tips and Tricks
Once you’re comfortable with Scrivener’s interface, you can start taking advantage of more advanced functions and features. Here’s a quick guide to some of our favorite features:
Full-Screen Mode: Find that you get distracted while working in the editor in window mode? Want a less cluttered spot to do your writing? Mouse to the upper right corner of the toolbar to the second-to-last white-square icon. Click it and you’ll find yourself in full-screen mode—a distraction free writing space. The bottom of the screen has a variety of tools to control the appearance of your space.
Split View: This is invaluable for anyone who has ever wished they could look at two parts of the same document at once. Below the editor’s toolbar, you’ll see a small split-box to the right-hand side:

Click and the editor will split into two. You can navigate to any file within either split-pane or look at different parts of the same document.
Writing Tracker: If you’re wondering how many words you’ve written in a particular session, visit the writing history tracker. This can be accessed by navigating to “Project” -> “Writing History.” This will give you a full view of all the words written in your project, breaking it down by day and month.
Word Frequency: To look at the frequency of word usage in your project, navigate up to “Project” -> “Statistics,” then click “Word Frequency” at the bottom of the window. A new pane will appear, detailing the use of every single word in your project. Looking for a specific word? Organize the frequency alphabetically. Wondering if you’re overusing a term? Organize by frequency and check the word. From there, you can use Scrivener’s search function to narrow down your editing focus.
Color Coding: For the writer whose drafting process is more like a program debug of Drafts 1.2, 1.2.1 and 1.2.2, editing “passes” can be hard to distinguish. Not with Scrivener. Visit “Format” -> “Revision Mode” to turn on text colors while you’re revising your files. And if you want to color code even further, secondary-click on any file within the Binder to open the file options menu and scroll to “Label.” Select a label color and the file’s icon will change colors automatically. You can also change the names of each label under “Edit” within the label menu, which will save the need for any sort of key to your color-coding.
Synopsis and Notes: Remember the Inspector pane that we discussed earlier? Here’s where you’ll want to expand it from collapsed mode. Mouse over to the far-right side of the screen and click the blue “I” button. The inspector will unfold, revealing a section for a synopsis and notes. These sub-windows are fantastic for making notes or reminders on your document that you’d prefer to keep out of a separate research file. The synopsis pane is also helpful for condensing a scene down to a sentence or two.
Snapshots: Another hidden gem of the Inspector pane, Snapshots will prevent any accidental overwrites or losses on the original version of a file. Simply navigate to the camera icon under the Inspector to open the Snapshot tab and click the “+” button to the right to take a snapshot of the file as it currently stands. You can take multiple snapshots of a file and “roll back” a file to an older version at any time.
Again, remember: no two writers will use Scrivener the same way. Using such a feature-rich program means picking and choosing the tools that work for you. Don’t feel compelled to use a tool if it’s not making a positive impact on your writing process.
|
Learning More
If you’d like to upgrade your Scrivener skills from intermediate to super-user, there are plenty of resources to look into. Consider:
Scrivener Built-In Tutorials and Manuals: Remember those tutorials that pop up on the project selection screen? They’re a fantastic resource for working with Scrivener’s more advanced functions. The manual takes a good bit of time to read through, so it’s better as a reference for specific functions.
Taking Control of Scrivener 3: The developers behind Scrivener, Literature and Latte, cite this as the official guide to Scrivener 3. It’s a readable handbook that breaks all the features down. If the tutorials and manuals are still a bit intimidating, this guide bridges the gap nicely.
Helping Writers Become Authors Scrivener 3 : K.M. Weiland’s blog has a great selection of articles on Scrivener including an editing guide and free project templates. This is the place to start if you’d like to see a run-through of the newest features of Scrivener 3.
Free Webinars: There are an endless number of courses available on the internet. Occasionally, these programs will offer free webinars to showcase the course to new customers. The best webinars will focus on tips and tricks within Scrivener rather than simply selling the course, so they can be worth exploring.

Be confident about grammar
Check every email, essay, or story for grammar mistakes. Fix them before you press send.
