There are several tools out there to help you format your eBook for self-publishing. I’m sharing what I’ve tried and what has worked best for me. My primary goal when formatting my eBooks is a professional look. I don’t bother with fancy flourishes or coloured text.
Picture books and other books with images require advanced formatting knowledge, but if you want to learn the basics of formatting your book for self-publishing, including some pros and cons of the most popular tools, keep reading.
6 Self-Publishing Tools You Should Know About
It may take a bit of trial and error to figure what tools work best for you. This is normal. It’s hard to know if you enjoy using a product without trying it. Many of the tools I use are free or offer free trials so you can find out if they’ll work for you before buying them.
Highly Recommended: Scrivener and Vellum
There are two programs I feel are important to mention because they come so highly recommended by other authors. While neither one works for me, it doesn’t mean they won’t work for you.
If they work for you, Scrivener or Vellum could be your new best friend. Vellum is only available on a Mac, so because I’m on a PC, I haven’t tried it and can’t speak to its effectiveness. What I’ve heard from other authors is that although Vellum is expensive, it’s a one-time purchase and well worth the money.
You can download Vellum for free here and only pay for it once you’re ready to generate your eBook. Vellum also formats print books.
Where Vellum is strictly a formatting program, Scrivener is a complete research, writing, and formatting tool. I tried to learn Scrivener years ago, but the learning curve was just too steep for me.
However, there are several authors who swear by this program, because it’s so easy to format your book (eBook or print) once you’re ready. You can edit your Scrivener documents easily with the ProWritingAid Desktop App and there is also a new formatting software called Atticus that is just like Vellum, but works on Mac and PC. So, if you're a PC user, then you should definitely check that out.
Download a free trial of Scrivener and learn more about the program at www.literatureandlatte.com.
Worth Considering: Kindle Create and Draft2Digital
KindleCreate and Draft2Digital are two free options you can use to format your eBook. KindleCreate is Amazon’s free formatting tool. Both KindleCreate and Draft2Digital will format your books based on a Microsoft Word document.
I tried both programs and found they each required a bit of time to get the final eBook looking professional, so I ended up using my tried-and-true method, which I’m sharing with you next.
My Favorite Self-Publishing Tools for Formatting: Microsoft Word and Calibre
Google Docs is my favorite way to write my book, and if you’re a Google Docs user, you may have noticed that Google Docs includes an option to download to an ePub.
When I first learned about this, I thought it would be a great timesaver, but even though I had formatted my book in Google Docs with proper styles and chapter headings, when I viewed the ePub in my Kindle previewer, it looked awful. Nothing was aligned properly and the chapter headings were way too large.
So, the tools I use without fail for formatting my eBooks are Microsoft Word and Calibre. I want to be clear that Microsoft Word is a word processing tool, not a formatting tool. But most formatting tools will require you to start with a Word document that has been formatted using Styles.
Calibre is an eBook management program that allows you to view and edit eBooks and format them. It’s free with the option to make a donation, and it’s available for both PC and Mac. I only use Calibre for formatting my books, and I’ll explain more about that after I share a few tips for streamlining the formatting process.
Formatting Front Matter
The front matter of a book includes a half-title (if applicable), copyright information, a dedication, acknowledgements, and a table of contents (if you’re including one).
The font in an eBook is adjustable, which means readers can change the style and size of the font when reading your eBook. For this reason, I use a common font like Times New Roman or Arial. I also recommend making your half-title a jpeg. This way, if readers adjust the font, your half-title won’t change and end up looking distorted.
To create a jpeg version of your half-title, type the book title in your desired font (preferably matching your cover) then use your computer’s snipping tool to create an image of the text and insert the image as the first thing in your Word document.
Fomatting Your Story Body
For eBooks, I like to set Microsoft Word so it automatically hyphenates. You can test this feature out and see which look you prefer, but I found when Word doesn’t hyphenate, there are strange spaces throughout the eBook.
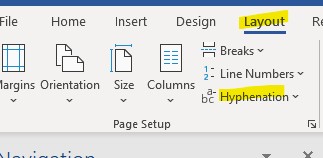
To set up hyphenation, go to the Layout tab, then click the hyphenation drop-down arrow and choose “automatic.”
How to Use Microsoft Word Styles
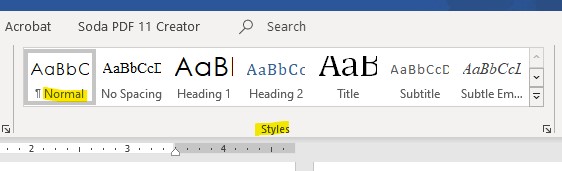
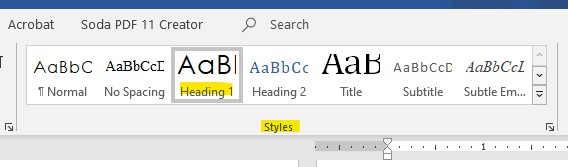
Use the “Styles” feature in Word to set up your Normal style. This includes your font type, size, justification, and line spacing. You will find the Styles toolbar under the Home menu. Anything you want to show in your table of contents needs to be formatted as Heading 1.
I learned how to use Word’s Styles from Brian Jackson through Skillshare, but he has similar information in this video on his YouTube channel. This is more in-depth than you need for formatting your eBook, but it will give you a good idea of how to use the Styles feature. I only ever use Heading 1 for my chapter formatting. I haven’t needed to use any of the other heading levels.
Standard font sizing in novels ranges from ten to twelve, with paragraph indents being 0.3 to 0.5 inches. The first line of a chapter or scene usually isn’t indented, so you will have to change this manually if you are going to follow this protocol.
How to Use Microsoft Word Headings
You might need to adjust the font size if you use large numbers for your chapters. If you change this in the Styles toolbar, it will change for all your headings, so if you just need to adjust one heading in your manuscript, then simply highlight that heading and change the font size. Be sure to include a page break before all your chapter headings. You can do this in your Heading 1 options. Brian shows you how to do this in the video linked above.
The same goes for any justification changes you want to make to your Normal style. For example, the body of a story is justified, so the text is spread evenly across a page. This might not look right for the copyright or acknowledgments sections, so you can highlight the text and change the justification as needed. If you change the Normal style, then it will change everywhere in your document you have used that style.
Formatting Back Matter
The back matter of a book includes author notes and/or author bios. Some authors will include acknowledgements in the back matter rather than the front matter. This depends on your preference.
Remember, anything you want to appear in your table of contents, such as the author’s note or author bio, should use the Heading 1 style. The headings are what Microsoft Word uses to generate the table of contents. The body text of back matter items can be typed in Normal style.
If you plan to include links to other books you’ve written in your back matter, you may want to create more than one version of your eBook, or use universal book links. Some distributors won’t allow books on their platform that link to other platforms in the back of the book, and they may ask you to remove your book.
Creating a Table of Contents
You can use Calibre to create a table of contents, but I prefer to do it in Word as the very last step before I import my file to Calibre.
To insert a table of contents in Word, put your cursor where you want it to go. Under the References tab, you’ll see Table of Contents as the first option on the left. Use the drop-down arrow to choose the style you like or choose “Custom Table of Contents” for more options.
Always update your table of contents as your last step after you’ve made any changes to your manuscript.
Formatting with Calibre
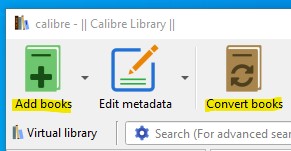
Calibre is a lot more than just a formatting tool, and I haven’t even begun to explore its many functions. I use it for basic formatting, and that’s it. Click on the book with the plus sign that says “Add books” to import your Word document.
Once you see your manuscript in Calibre’s list of files, click on the file so it’s highlighted (one click should do), then choose the book with two circular arrows that says “Convert books.” Follow the prompts to upload your cover and enter your metadata, then choose your export format from the drop-down box where it says “Export format” and click “Export.”
Here’s a more detailed video walkthrough of Calibre that includes a section on formatting your books at around the three minutes 44 seconds mark. I use Word as my input format, then export to either ePub or MOBI.
Once your eBook is formatted, remember to preview it and make sure everything turned out how you expected. I always use the free Kindle Previewer for this step and check things like proper linking in the table of contents and that any website links I include work.
Takeaways
While there is a lot of information here, formatting your own eBooks is a simple process once you get the hang of it. If you’re only publishing on Amazon, they will accept a Word document, so you can skip the Calibre step. Experiment and decide what styles you like the best, and before you know it, you’ll be an eBook formatting pro!

Be confident about grammar
Check every email, essay, or story for grammar mistakes. Fix them before you press send.