
So you’ve decided to write a story and hope to publish it. For write-to-publish newbies, you might want to know what you’re getting into, especially if you’re working on a large project like a novel. It’s natural to wonder: how many drafts will it take before my story is ready to publish?
Unfortunately, you’re more likely to answer “how many licks does it take to get to the center of a Tootsie pop?” before knowing how many drafts you’ll need before publication. Here’s why.
A rose by any other name: What’s in a draft?
The biggest problem with breaking down the writing process from first to last draft can be linked back to one little detail:
How do you define a draft?
There are as many ways to define the word “draft” as there are writers. Which means every writer’s version of “the writing process” will look different. It’s impossible to say: “oh, writing a novel will take five drafts.”
Because the definition of “draft” can vary so much, it’s useful to think about drafting on a spectrum:
- The fewest drafts: Only rewrites count
- Middle-of-the-road: The fiction patching method
- The most drafts: Every change counts
Keep reading for more on how this draft spectrum works.
Only rewrites count
The minimalist take on drafting. By this definition, only full rewrites of a piece count as a true draft. Which means when saving a manuscript to a file, you wouldn’t alter the file name until you completely rewrite that chapter, section, or piece.
The advantage here lies in simplicity: you have fewer files to juggle since you’re saving to the same file over and over. But you may risk losing details from earlier drafts because of the repeat saves. Plus, for larger projects like novels, you need to divide your manuscript into parts and have a file system in place to keep track of your revisions.
The fiction patching method
While this started as more of a joke between writers on social media, it’s a great middle-of-the-road way to think about drafting. It takes cues from software versioning, noting that not every change means a new draft. Smaller changes are like patches (the version’s third number) and rewrites might be closer to updates (the second number) rather than a new version release/new draft (the first number).
So draft names might look like this:
- Draft 0.1: Outline
- Draft 1.0: Rough Draft
- Draft 1.5: Rough draft with some rewrites
- Draft 2.0: Rough draft fully rewritten with feedback from critique partners
- Draft 2.0.1: Rewritten rough draft with a minor tweak (or “patch”) to the protagonist’s motivation
Here, you can always revisit an older version to review details you want to re-emphasize in rewrites. But, it’s easy to end up with dozens if not hundreds of files and you’ll have to decide what constitutes a “patch,” an update and a brand new release ahead of time to stay consistent with naming.
Every change counts
Taken to its extreme, this approach to drafting may seem silly. Why would anyone count every change as a new draft? But most writers favor a less extreme version of this approach. It’s how we end up with draft names like “Final draft” and “Final draft I swear,” and “No really this is the last draft.”
Fortunately, this means you’ll never lose a detail again and you have complete control over naming conventions. However, you can end up with hundreds of files in a blink. And, if you’re not careful with what you name each file, it may take some detective work to figure out which one is the most recent version.
So, where do you fall on the drafting spectrum? Keeping it in mind can help you estimate the number of drafts you might need before publishing your story.

From outline to finished product: the writing process
Now that you have a better understanding of what the word “draft” means to you, you can look at the writing process with fresh eyes.
While it’s impossible to say how many drafts a manuscript takes, it is possible to break the writing process down into stages. We can define the process in 5 stages:
- Outline
- The rough draft
- Content edits
- Line edits
- Proofreading
Try not to think of this as a step-by-step process. It’s more like a series of loops as each one of these stages may require multiple revision rounds. Sometimes, the process can feel like one step forward and two steps back, but each round will strengthen your manuscript.
Let’s look at each stage.
1. Outlining
We couldn’t talk about the writing process without touching on outlining. Planners, applaud and cheer as much as you’d like—just make sure not to upset your color-coded highlighter sets.
Pantsers, resist the urge to skip this. It still applies to you, even if you think it doesn’t.
Like a draft, there are thousands of ways to define the term “outline.” But whether you fall on the planner detailed scene-by-scene index card method or the pantser “I know the ending. How I get there is up to the characters” end of the spectrum, you need some form of an outline.
The point of an outline is to ensure your writing produces a story with a plot. Otherwise, you risk writing pages and pages in which your characters run around and do things but never advance the plot.
So at the bare minimum, an outline requires you know:
- Who your protagonist is
- Who your antagonist is
- Why the protagonist and antagonist have a problem with each other (otherwise known as your central conflict)
- Where the story starts
- Where the story ends
Pantsers, breathe a sigh of relief: you don’t have to answer any of these questions in detail for it to count as an outline. You just need to know where you’re starting and where you’re going. You don’t even need to use a pen and paper—try these three fun outlining methods.
Spend as much or as little time on this stage as you’d like.
But once your outline is complete, you can move onto what most of us think of as the “real” writing: drafting.
2. The Rough Draft
This is the most crucial aspect of writing a story. Fortunately, it’s also the one stage that’s impossible to get wrong.
There’s one goal to a rough draft: get the story out of your head and onto a page in a somewhat comprehensible form. That’s the only focus. So if you’re writing, you’re succeeding.
Most writers face perfectionist paralysis in the rough draft stage. We think that because the writing doesn’t match what we see it in our heads, it’s bad. Or the story’s going to be bad. Or we’re bad writers.
If you’re in the analysis paralysis camp, invoke Anne Lamott’s “Sh*tty First Drafts” rule. To quote the late great Terry Pratchett, “the first draft is you telling yourself the story.”
So don’t judge it. Or better yet, accept that it’s bad. Cringe, wince, make faces. Just get it down on the page. Because you can’t edit a story that’s floating around in your head.
Editing
So you’ve finished your rough draft. Take a moment to celebrate! Your story is out of your head and onto the page.
Next up: editing.
Writers usually see editing as a terrifying mountain or a fun challenge. But there’s no denying it’s a monumental job, no matter how long or short your story is.
Because the scope of editing can be overwhelming, it’s easiest to break the process up into steps. Those steps are:
- Content edits
- Line edits
- Proofreading
Here’s a breakdown of each.
3. Content Edits
A content edit is just what it sounds like: a pass editing the content and story of your work. This is the place to catch plot holes, character inconsistencies, and scenes that are a bit of a slog. For some, it’s easier to think of this as a “rewriting” round rather than an “editing” round since you’re making large-scale changes.
Sometimes, content edits are obvious on a read-through of a rough draft. Yet the longer you’ve worked on a piece, the harder it is to spot those editing opportunities.
Self-editing
Each draft you write marks progress in your writing abilities. When you read back over the first few scenes you wrote, you’ll be amazed at how far you’ve come. This is why the self-edit is so important. You need to apply your newfound skills and perspective to your manuscript so that it’s the best it can be before you open it up for feedback.
The first step is to use an editing software like ProWritingAid to help you spot issues with overly long sentences, awkward constructions, unruly dialogue tags, and pacing. Using an editing tool at this stage helps you to get the most out of any human beta-readers and editors you may reach out to down the line.
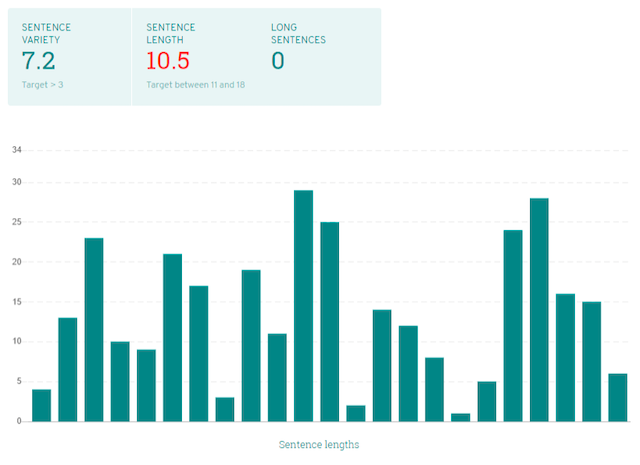
Some reports give you the tools to visualise your draft at a glance to see where you need to focus. The Sentence Length Report shows you all of your sentences in a handy bar chart so you can cut long, winding sentences down to size. This will help keep your ideas clear and avoid any readability issues.
Other reports let you get to work directly on your manuscript, like the Overused Words Report. This report highlights words that are often overused in published writing. These are words like could, just, and feel that point to vagueness or telling rather than showing.
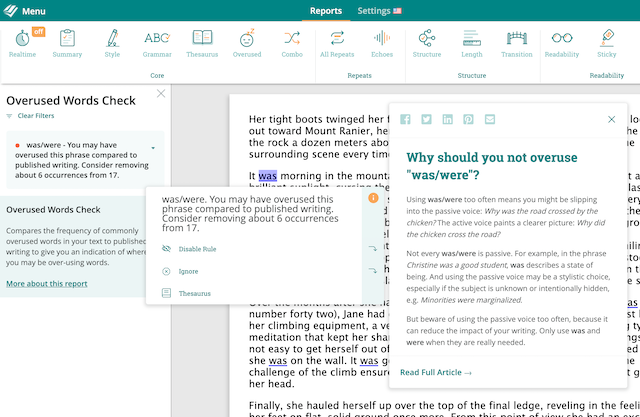
The report lets you pick out these words and change them to make sure your description is doing the work it needs to to immerse your readers.
Learn how to approach the self-edit, and how ProWritingAid can help.
Critique partners and beta readers
Once your first self-edit is complete, you’ll need a fresh set of eyes to help direct your efforts. Enter critique partners and beta readers.
On the surface, it may sound like critique partners and beta readers do the same thing: they both read through your work and provide feedback.
However, there’s some nuance that separates the two:
Critique partners are writers who read like writers. But beta readers are writers or readers who read like readers.
Because your critique partners are fellow writers, they’re great at spotting technical issues, like:
- Weak character motivations
- Stilted dialogue
- Clichéd descriptions
- Continuity errors
Getting this technical feedback is especially helpful before handing your story off to readers, so it’s best to let your critique partners read a story before jumping into a beta reading round.
As a bonus, your critique partners can spot these issues and help you figure out ways to fix them while you’re both “talking shop.”
Beta readers, on the other hand, are fantastic for getting feedback on emotional reactions to your story, like:
- Whether a certain character was likable or not
- If certain chapters felt too fast or too slow
- Whether the conflict kept them engaged
- If they found themselves wanting to read more
Here, you’re getting close to how a reader would react to your story once it’s published. Use their feedback to determine if the story prompts the response you intended it to and edit accordingly.
Now, a quick note on the biggest difference between beta readers and critique partners: the detail level of their suggestions. If beta readers aren’t writers themselves, they may not be able to articulate the specifics of what they dislike in the story. Their feedback can be vague, amounting to: “I don’t like this scene, but I’m not sure why.” The best way to identify problem spots is to look at the feedback of all of your beta readers. If multiple readers have an issue with a scene or section, it’s a good indicator to pay close attention on editing.
Critique partners, however, can usually pin-point issues with laser precision, but may go overboard with their suggestions. Feedback may seem harsh and critique partners with a domineering streak may make “my way or the highway” style fix suggestions.
So it’s ultimately a fine balance. Note where you can improve and keep that in mind during your content edits, but also trust your gut instinct. In the end, it’s your story.
4. Line Edits
Once you’ve gone through a round or two (or more) of content edits, it’s time to move to line edits. These edits ensure your story is as strong as possible when it’s published. You’re examining your story, sentence by sentence, to catch dialogue issues, problems with the flow of a paragraph, and weak sentences that need rewriting.
If you’d like to hire a professional editor, this is a great stage to do it. But, if you’d prefer to tackle this edit yourself, ProWritingAid can make your process run much more smoothly. Check out our guide to six of the key reports that can make your line edits easy.
5. Proofreading
The proofreading stage is what most writers think of when they think of “editing.” Here, you’re checking for spelling and grammatical errors and ensuring consistency. Think of it as a final polish.
While some writers may hire a professional editor to proofread, it’s not a necessity, especially if you’re looking to publish traditionally. Often, a friend with a good eye for grammar can catch trouble spots on their read through. And ProWritingAid’s spelling and grammar reports can point out any little details they may have missed.
With your proofreading sweep complete, congratulations! Your story is ready to share with the wider reading world. Now, it’s time to move on to publishing or querying process.
If you’re looking to self publish your story, check out our webinar on the 7 Processes of Publishing. And for those who want to query, Jennifer Xue’s guide covers the process in depth.
Are you prepared to write your novel? Download this free book now:
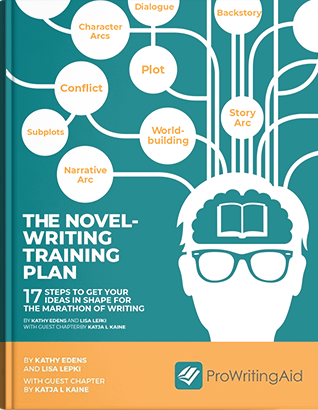
The Novel-Writing Training Plan
So you are ready to write your novel. Excellent. But are you prepared? The last thing you want when you sit down to write your first draft is to lose momentum.
This guide helps you work out your narrative arc, plan out your key plot points, flesh out your characters, and begin to build your world.

Be confident about grammar
Check every email, essay, or story for grammar mistakes. Fix them before you press send.
