Speaking directly to planners out there, if you haven’t checked out the program Outlining Your Novel, you’re missing out. I spent hours with this software and have never felt a more powerful urge to create.
Now, speaking directly to pants-ers, if you haven’t checked out the program Outlining Your Novel, you’ve most likely missed something essential in your current work-in-progress. This software gets down to the minute details and asks the urgent questions every WIP should focus on, like what’s something unexpected that could happen?
Whether you start with a character in mind and brainstorm a story arc or suddenly a story premise crashes your brain, Outlining Your Novel helps you get organized while offering ultimate creativity. If you’ve ever wanted a comprehensive, in-depth process to help you understand your characters down to the cellular level, Outlining Your Novel is it. Beyond character development is a thorough, question-lead deep dive into your premise, scenes, how everything ties together, world building, and so much more.
Outlining Your Novel is a complex program that requires more than a single post to explain its brilliance. This post is a high-level overview of what makes it fantastic.
Where to begin
You’ll get this screen when you first open Outlining Your Novel. It automatically uploads the demo project to help give you context for using the program.
You can jump in like I did and start looking around, but it makes more sense to view the introduction video on KM Weiland’s website first to get a feel for the program. You can see it here, or you can always click on the control button in the upper left-hand corner (the icon with a pen and a book) and click on "About Us."
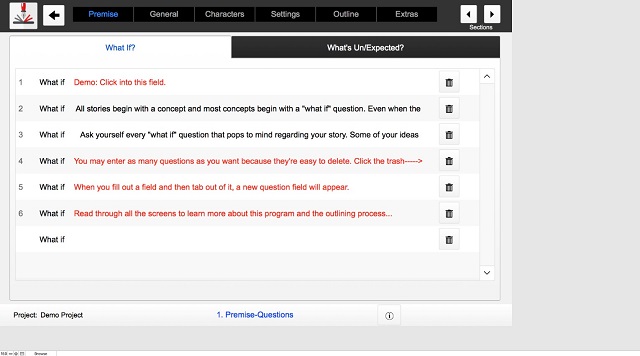
Premise
The software is structured to start with your premise, assuming you get an idea for a fantastic story that you want to flesh out. The first section helps you dive deep into your premise by asking a lot of fantastic questions like "What if?" and "What’s expected?" or "What’s unexpected?" You can see in the screenshot above the two tabs at the top, "What If?" and "What’s Un/Expected?" Make sure you click on both tabs to see all of the questions.
As you can see from the following screenshot, there are several sections under "Premise" to help you really get to the meat of your story.
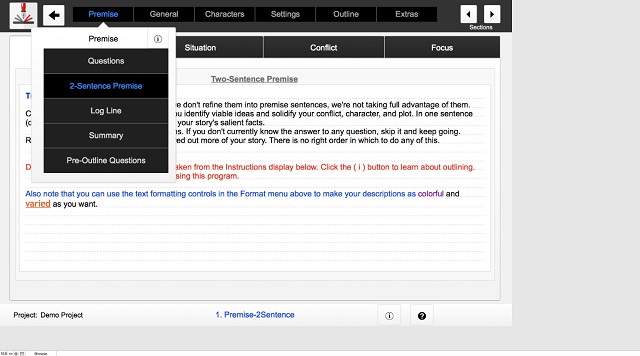
When you’re done working on a section, click the arrows in the upper right-hand corner to move to the next section or go back to the previous section.
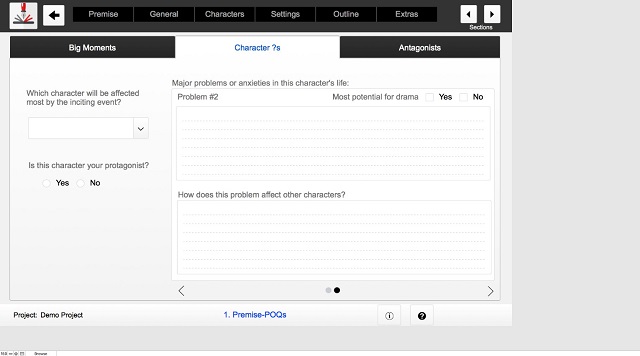
One important point to note: each menu section on the top menu bar (Premise, General, Characters, Settings, Outline, Extras) has several options in a drop-down menu. And each of these drop-down sections can have various windows in it. In the above screenshot, you can see three of the four windows: "Situation," Conflict," and "Focus." And each of these windows can have several screens you should move through. See in the bottom of the screenshot below, there are two dots; one is black, meaning that’s the active screen. To move between screens, use the arrows at either side of the dots. The following picture shows Premise->Pre-Outline Questions->Character ?s->(second screen):
It’s only confusing at first. You’ll get the hang of it quick enough.
General
The General section covers scenes, character arc and theme, conflict, and more. Here is where you begin to flesh out your story idea more fully. When you first come up with your story premise, you may be bombarded with scene ideas. Here is where you capture all of them. No idea is too crazy. They may or may not make it in your manuscript, but this is an easy way to brainstorm possible scenes. You can even color-code your scene based on its status:
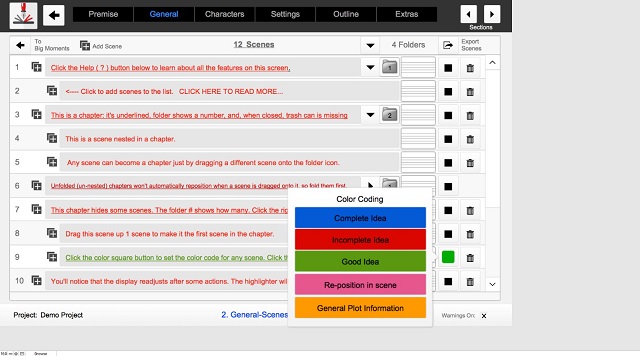
You can work on your incomplete scenes in "Connecting the Dots" or start working on your character arc and theme. Finally, the Conflict sub-menu has several screens to fill out. Each asks pertinent questions to help you develop the most intriguing and gripping conflict possible.
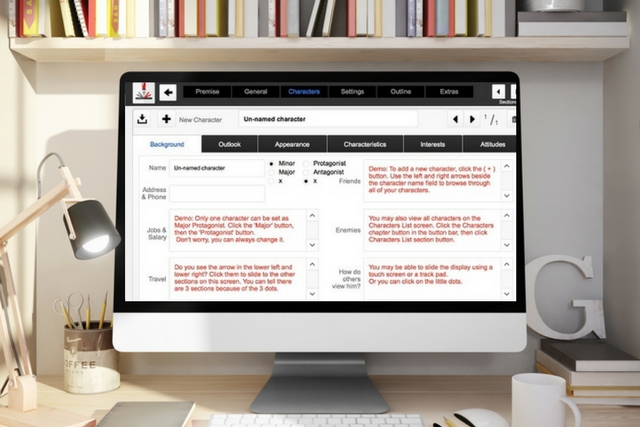
Characters
Hundreds of questions about your main character make sure you understand her or him deeply. You start by filling in her Backstory through several screens of questions. Then you move on to Interviews where the fun begins.
The screenshot below shows you the tabs to be filled out (Background, Outlook, Appearance, Characteristics, Interests, Attitudes), and most tabs or window have several screens to flip through when answering the interview questions.
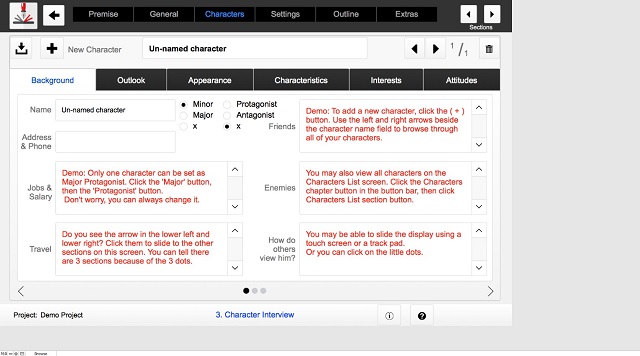
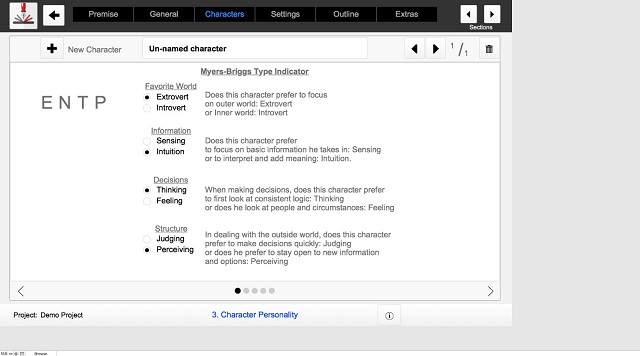
"Characters" is a pretty intensive sub-menu. Not only can you fill out their Backstory and complete an extensive Interview, but you can also conduct a Freehand Interview where you just let your character speak to you. You can run through several Personality plotters like the Myers-Briggs, Enneagram, and more.
Then when you’ve plumbed the depths of your main characters, it’s time to move on to Minor Characters. You can even bring up a Character List to see the highlights of each character and a few of their traits.
Settings
Your story’s setting can be just as important as characters in some instances. You can work on your main setting thanks to several screens of relevant and pertinent questions to help you understand your setting’s purpose better.
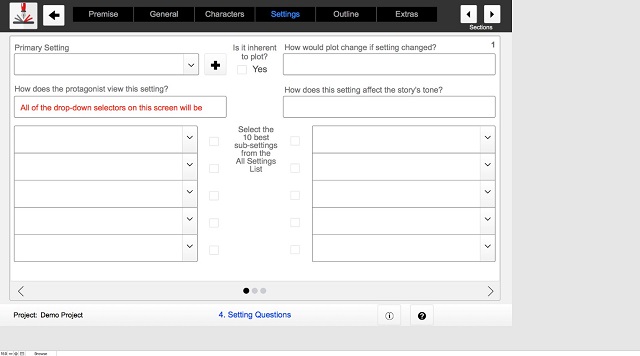
Three screens worth of questions covers just your main setting (see the dots at the bottom?). If you’re writing Sci-Fi, dystopian, or speculative fiction, there’s a World Building sub-menu with 24 detailed questions to help you flesh out your world. You’ll cover everything from the climate and language spoken to how advanced their medicine and science are and whether there are different races and natural laws.
Outline
Outline is where things start to take shape. You’ll focus on big-picture questions like what story elements you want to present, the tone of voice and POV you’re going to write in, who your main audience is, and how you plan to structure the three separate acts.

You can see in the screenshot above there are two separate screens on the "First Act" window, which is the same for the "Second Act," but the "Third Act" has three separate screens because your ending needs a little extra attention, right?
Extras
Do you like to mind map your characters or scenes? You can drag and drop your mind map directly into Outlining Your Novel. You can also include a picture of your world’s map if you’re writing about alien worlds or ancient times. But the best features are:
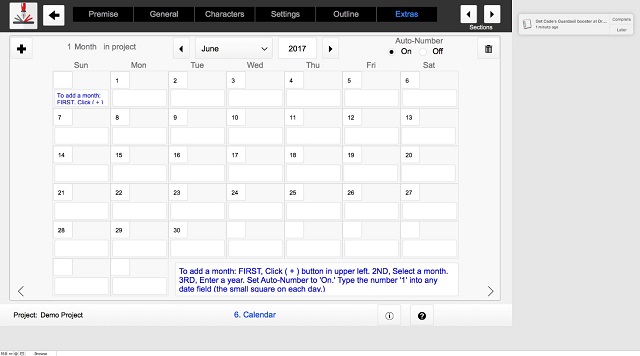
- Calendar. Keep everything chronologically in order by plotting it out on the calendar so your readers aren’t confused.
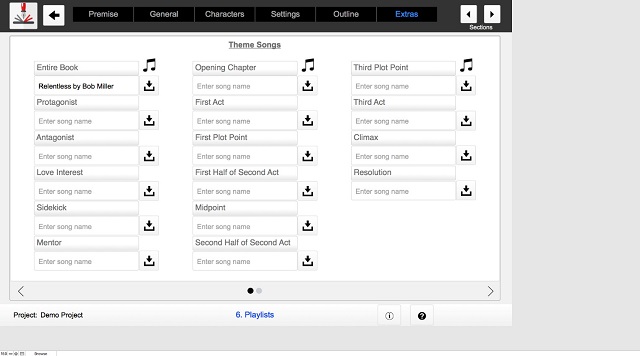
- Playlist. Do you like to create playlists while you work to inspire you to greater heights? You can add your favorite tunes to characters, scenes, plot points, acts, climax, and resolution. Then simply click to play.
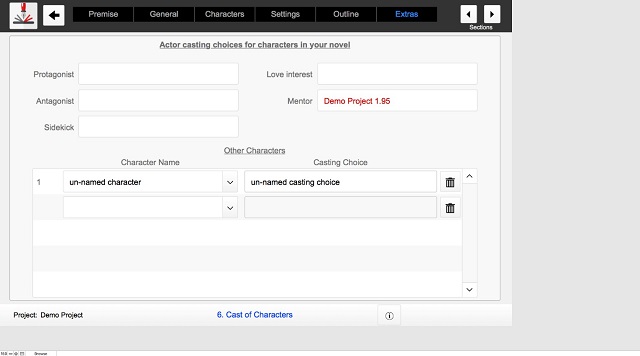
- Cast of characters. Do you like to envision which actors will play the parts in your stories? You can record all of those thoughts in this section. Plan out who will play your main character, the love interest, the antagonist, all the way down to the other minor characters.
Final thoughts
You don’t need to follow the order in which sections are laid out. If you have your premise first, start there. If a fully-formed character pops into your head first, go to the Character sub-menu. There is no right or wrong way to outline your novel. The best way is the way that works for you.
The only drawback I found was in exporting your outline for use outside the program. Actually, exporting is easy and is a great way to make a backup copy of your files. But it saves the files in FileMaker format, which can only be used with Outlining Your Novel. You can always print out your outline for use. Or you can export your Scene List separately from the Scene List screen into a text file that you can then drag and drop in Scrivener or Word.
Spend some time going through the program, reading all sections to get a feel for how it works. By the time you get to the Extras, you’ll be ready to dive into a new project. Or even bring a work-in-progress on board and flesh it out with this amazing tool.
Pants-er or planner, you’ll love Outlining Your Novel for the sheer creativity and imagination it takes to answer all these questions.

Be confident about grammar
Check every email, essay, or story for grammar mistakes. Fix them before you press send.